USE CODE: FREEBAKEBOX AND GET YOUR FIRST BOX FOR FREE WHEN SIGNING UP TO A 3, 6 OR 12 MONTH PLAN. OFFER ENDS 28 FEB!
SAFFRON
WREATH
TOTAL TIME: 2-3H
Celebrate the Nordic love for buns with this irresistible saffron wreath. It is infused with a hint of csaffron and then filled with a creamy almond filling and cranberries, this fluffy bun wreath is a taste of nordic winter. Topped with a sprinkle of almonds, it's visually stunning and bursting with flavour. Perfect for fika gatherings or parties in the holiday season, it's fun to make, guaranteeing a satisfying outcome every time!

1. MIX THE INGREDIENTS
Start by adding the bag of saffron to the milk.
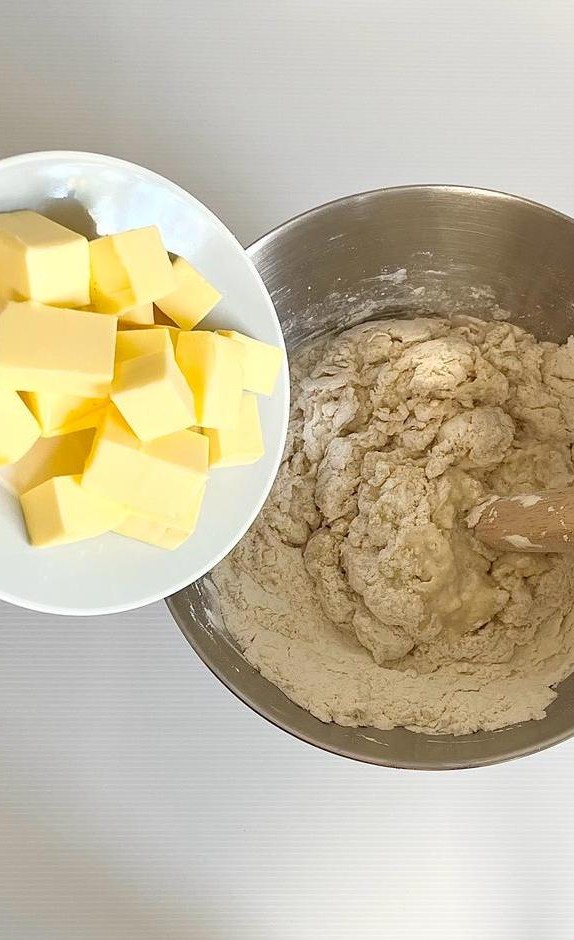
When adding the ingredients, ensure that the milk is lukewarm, but not warmer than that. You can check the temperature by placing your finger in the milk. If it feels room temperature and not hot, it is at the desired temperature. Mix together all the ingredients in a mixer using the dough hook, or mix it by hand and add the butter last to get a more elastic dough.

2. DO A GLUTEN TEST
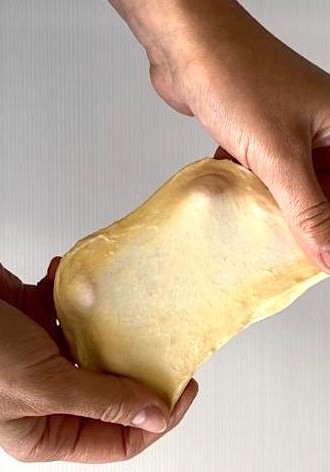
Knead the dough for a good 10 min to make sure gluten threads has formed. To ensure that the dough has achieved the desired consistency and the gluten strands have developed properly, do a gluten test. Take a small portion of the dough and gently stretch it. The dough should be elastic and appearing thin and fine. You should be able to pull the dough without it breaking. If the dough does break, it means that further development is needed. Place the dough back in the mixer (or knead by hand) and work it for an additional minute to enhance gluten formation.
3. MAKE A ROLL
Let's start with making the filling by mixing bag c with 75g of softened butter. Softened butter works better than melted butter here because it keeps the filling from oozing out too much. Just make sure it's soft enough to spread evenly over the rolled-out dough.
Now, place the dough on your kitchen counter and roll it out with a rolling pin until it forms a rectangle about 35x30cm in size and with a thickness of about half a centimeter. Then, grab a spatula and spread that delicious filling evenly all over the dough, making sure to cover every inch of the rectangle. Then sprinkle the cranberried on top.
Starting from the top along the long side of the rectangle, tightly roll the dough, folding it over by half a centimeter each time until the entire dough is rolled up into a 35cm long roll.
4. CREATE A CIRCLE
First, prepare a oven tray by covering it with baking paper to prevent sticking.
Now, carefully lift the rolled up dough onto the oven tray, and then gently place it into a circe, ensuring the ends meet to form a complete circle. To close the circle securely, take one end of the dough roll and open it up like a mouth, placing it over the outer end of the circle, and lightly tuck it in underneath. This creates a seamless closure.
.
5. CUT A BRAIDED PATTERN
Next, it's time to cut the wreath. Using a pair of scissors, make a diagonal cut into the dough, about 2cm deep, and then push the resulting flap to the right. Move approximately 1-2cm along the wreath and repeat the diagonal cut, this time pushing the flap to the left. Continue this alternating pattern around the entire circle, creating a visually appealing design. Ensure that all the edges of the flaps are gently tucked in to the sided to maintain a neat appearance.
6. LET IT REST & RISE
Once the wreath is formed, cover it with a clean tea towel. Allow it to rest for 1. to 2 hours.
The rising time may vary depending on the temperature in your kitchen. Warmer temperatures will require a shorter rise, while cooler temperatures may require a bit more time. The wreath is ready when they have nearly doubled in size. This resting period allows the dough to rise and develop flavour, resulting in a beautifully fluffy and flavourful wreath.
For an accelerated rising process, try this technique:
1. Place the wreath inside a cold oven.
2. Position a small bowl containing one (1) cup of boiling water at the bottom of the oven.
3. Close the oven door to seal it shut.
This method creates a warm, humid environment, which facilitates quicker and more efficient rising.
7. BAKE
Let's start by preheating your oven to either 220°C for a conventional oven or 200°C for a fan-forced oven. This ensures that the oven is at the right temperature to achieve perfect baking results.
Now in a small bowl, whisk together one egg with a dash of water and sprinkle of salt. Then gently brush the wreath with the egg mixture. Now sprinkl the chopped almonds on top.
Place the prepared wreath in the middle of the oven and bake it for around 10 to 14 minutes, or until it's beautifully golden brown. Keep an eye on it to avoid over-browning..
8. WREATH IS DONE!
Your wreath is now ready to be enjoyed! Serve it warm or at room temperature for a delightful treat that's perfect for any occasion
STORAGE INSTRUCTIONS
After your wreath has cooled, it's important to store it properly to maintain its freshness. We recommend placing it in a airtight plastic bag or a food storage container.
This extends its shelf life. If you find that you won't be able to consume all on the same day, don't worry! Baked goods can be stored in the freezer. Simply put it in freezer-safe bags, and store it in the freezer. This allows you to enjoy your homemade bun wreath for an extended period.


